Facebook is no longer just a social media platform where you can update your status, upload pictures and videos, or chat with your friends. In 2022, Facebook has emerged as one of the best digital marketing tools to help your business grow, and brands are aware of this.
Facebook generated gross ad revenue of INR 9,326 crore during the pandemic only from the Indian market, recording a 41 per cent annual growth. Today, more than 200 million SMEs have been using Facebook to market their products and services. By using various Facebook Business Tools, brands capture the market, having more than 2.6 billion monthly active users.
So, if you are already using Facebook to promote your brand, you need to step up your game by using Facebook Pixel. Read the article to know about Facebook Pixel in detail.
Table of Contents
What is Facebook Pixel?
Facebook Pixel is a snippet or a piece of code that you install on your website to analyse the performance of your Facebook campaigns. It collects data based on the actions taken by the users after seeing your ads to help you track the conversion rate and optimise the future ads.
With Pixel, you can retarget users who have checked your ad but haven’t made a purchase. Additionally, Facebook uses the data to enhance its ad performance by showing the ads to interested people and are more likely to take action.
How Does Facebook Pixel Works?
The Facebook Pixel places a cookie on the users’ browser when they visit your website after seeing your ad on Facebook. It gets stimulated every time the user interacts with your website and sends the data to Facebook Pixel.
Pixel, on the other hand, collects the data and allows you to monitor the behaviour of the users, such as,
- Pageviews,
- Payment Info,
- Average Time on Page,
- Scroll Depth,
- Purchase,
- Add to Cart,
- Add to Wishlist,
- Registration,
- Contact, and many more.
You can analyse the data to decide if the Facebook ad is bringing you enough leads or meeting the goal of your campaign. If not, you can stop the ad and save your penny from being wasted in an inefficient ad campaign.
In addition, you can use the data to create your subsequent Facebook ad campaigns by targeting only the audiences that showed interest in your previous ads or by featuring the products that people mostly viewed or purchased.
How to Setup Facebook Pixel?
Setting up Facebook Pixel might look tricky, but trust me, it is a super easy task. Mentioned below is a step-by-step guide on how to install Facebook Pixel on your website:
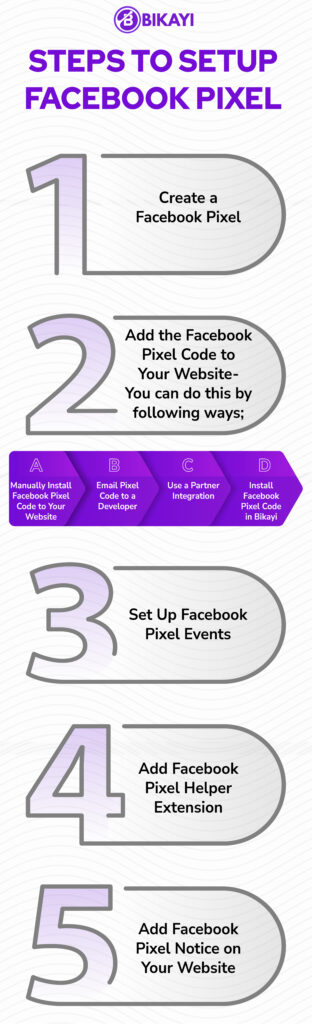
Step 1: Create a Facebook Pixel
- The first step is to create the Facebook Pixel. So, log in to your Facebook Business Manager and go to Facebook Event Manager. Next, click on Connect a Data Source – Web – Facebook Pixel and click on Connect.
- Fill in all the details, such as your website’s Pixel name and URL. Now click on Continue.
Step 2: Add the Facebook Pixel Code to Your Website
There are three ways to integrate or add Facebook Pixel code to your website. Let’s discuss each method in detail.
a) Manually Install Facebook Pixel Code to Your Website
To set up Facebook code manually,
- Select the Pixel you want to install in your Event Manager,
- Click on Continue Pixel Setup,
- Then, select Install Code Manually,
- Copy the Pixel code that would pop up on your screen,
- Go to your CMS or web platform, and paste the Pixel code at the global header section, just above the closing head tag,
- And, save the changes made.
Pro Tip: Putting the code in the global head section saves you from manually installing the code on every page of your website.
b) Email Pixel Code to a Developer
If you want your developers to install the Facebook Pixel code on your website, then follow the steps below to email the code to the team,
- Go to your Event Manager,
- Select the Pixel you want to install,
- Click on Continue Pixel Setup,
- Now, click on Email instructions,
- Enter the email address of the recipients,
- Lastly, click on Send.
c) Use a Partner Integration
In case you are using a partner integration, such as Bikayi, follow the below-mentioned steps:
- Go to your Event Manager,
- Select the Pixel you want to install,
- Click on Continue Pixel Setup,
- Next, click on Use a Partner,
- Select the partner for integration from the list,
- Go to the partners’ website or app and follow the instructions to set up Facebook Pixel.
Install Facebook Pixel Code in Bikayi
If you are own a Bikayi store, the following steps will help you set up your Facebook Pixel,
- Follow the above steps (Use a Partner Integration) to generate your Facebook Pixel ID,
- Copy the Pixel code,
- Go to Bikayi Services Menu,
- Select Facebook Pixel,
- Paste the Pixel ID or code,
- Click on Save Facebook Pixel Code button.
Step 3: Set Up Facebook Pixel Events
Once you install the Pixel code on your website without any errors, you can set up Facebook Pixel events to track the users’ activities by using the Event Setup Tool. Here is a tutorial on how to set up Pixel events by using the Event Setup Tool,
- Go to the Event Setup Tool,
- Click on the Open Event Setup Tool button,
- Select the Facebook Pixel ID for which you want to create events,
- Click on Settings, and then click on Open Event Setup Tool,
- Enter the URL of your website, and click on Open Website,
- Now, Facebook will suggest you a list of events. Click on the Review option mentioned next to each event, and choose Confirm or Dismiss.
- Click on Finish Setup to complete the setup.
Step 4: Add Facebook Pixel Helper Extension
Facebook Pixel Helper extension helps you detect whether the Pixel is tracking the events properly on your website. You need to install the extension on Google Chrome, and the extension is available only for Google Chrome, so you need to download it first if you use any other browser.
After installing the extension in your Chrome, visit the website or webpage you have installed Facebook Pixel. A pop-up will appear on the screen to show you the number of pixels available on that page and the errors detected (if any). You can rectify the errors to run your Pixel correctly.
Step 5: Add Facebook Pixel Notice on Your Website
According to Facebook Business Tools Terms, you need to let your website visitors know that Facebook Pixel is used to collect their data. And therefore, you need to put a notice on your website or a pop-up giving them the details. Also, it would help if you let them know the procedure to opt out from sharing their data.
What are the Benefits of Using Facebook Pixel?
Facebook Pixel is a great tool to keep track of your users for successful ad campaigns, build custom audiences, remarket your products, etc. Below are a few benefits of using Facebook Pixel,
- You can create retargeting campaigns
- Using the data, you can target the lookalike audiences
- You can measure the conversion rate and the performance of your Facebook Ads to increase the ROI
- You can take advantage of cross-device conversions
Facebook Pixel opens up many opportunities for you to convert your potential customers. Hope this article helps you understand the concept of Facebook Pixel better. If yes, then set up your Pixel now and take your Facebook campaigns to another level.